Showing posts with label workshop. Show all posts

January 18, 2015

3 Kaleidoscopes 3, or at last Kaffe Fassett


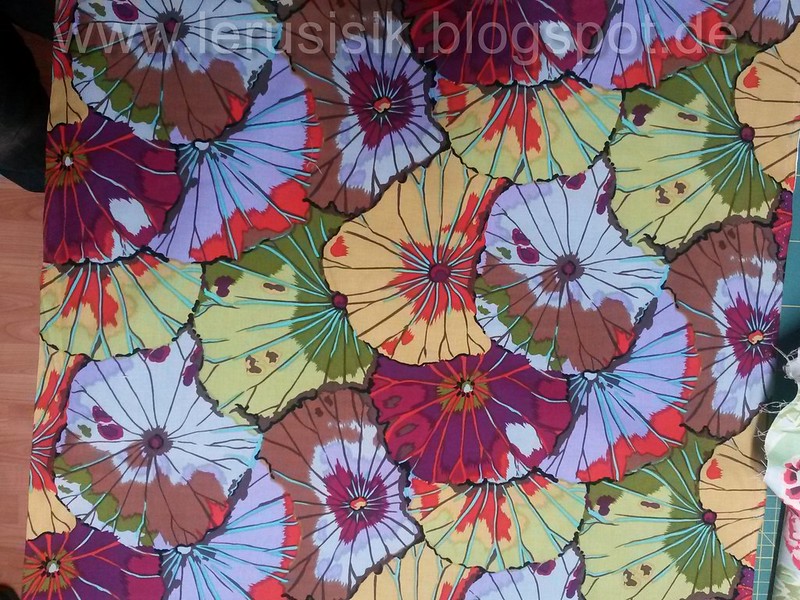
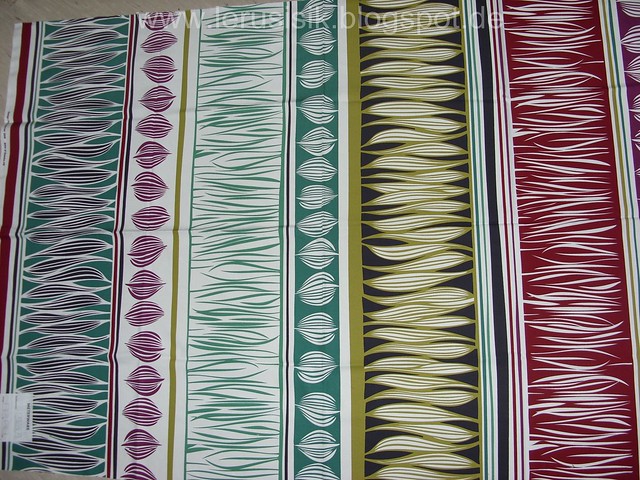
D  Ich liebe Kaleidoskope. Ich meine Quilts, nicht das Spielzeug. Auch wenn es absolut stimmt "hat man einen gesehen, hat man alle gesehen". Trotzdem. Normalerweise mache ich meine Kaleidoskope entweder aus recycelter Bettwäsche (die billige Alternative) oder aus den allgemeint als "hässlich" bekannten IKEA-Stoffen (die teuere Alternative). Diesmal habe ich jedoch einen echten Patchworkstoff bekommen, und zwar Lotus Leaf von Kaffe Fassett, aus der riesengemusterter Serie mit Blumen, Kohl, Artischoken usw.

E I just love kaleidoscope quilts. I know, once you've seen one, you've seen them all. And I don't need them any more! And they are way too much fabric consuming! And I still make new ones and look for fabrics for yet other ones. Usually I use for my caleidos recycled bed linen (the cheap alternative) or my favorite "ugly" IKEA fabrics (the expensive one). But this time I've got the real McCoy Kaffe Fassett's Lotus Leaf fabric:


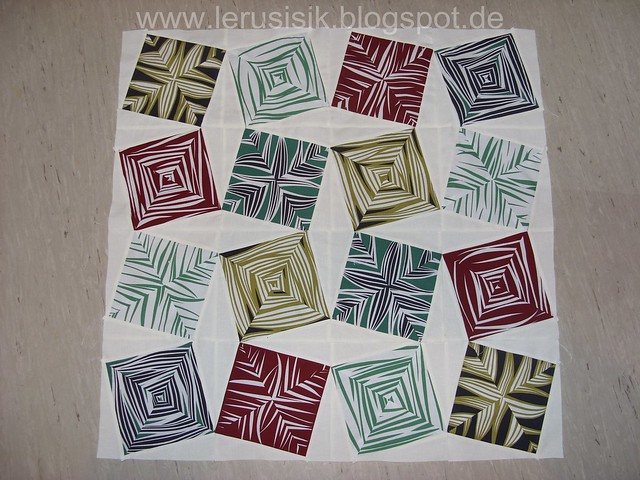
D  Was unterscheidet kaleidoskopische Sechecke von den 8-, 3- und 4-Ecken: es gibt nur eine Möglichkeit, ein Achteck  aus einem Stapel Dreiecke zu machen, aber für Sechsecke sind drei Varianten möglich und manchmal sehr schön. Während der Arbeit habe ich alle Varianten fotografiert, was mir Qual der Wahl unglaublich erleichtete: statt immer wieder Dreiecke neu anzuordnen, konnte ich einfach die Fotos durchblättern. Und die Fotos sind sowieso für die visuelle Entscheidungen besser, weil sie sozusagen "distanziert" sind, genauso wie ein Spiegelbild.
E The main difference between kaleidoscopic hexagons and other polygons is that you can make only one octagon out of a pile of triangles, but with hexagons 3 (or more) hexagons can be assembled out of one stack and often all of them are beatiful! To make the choice easier, I made a photo of each layout and then instead of turning the triangles again and again I just looked over my smartphone. For such decisions it's much better  to see the photo of the quilt, not the quilt itself. It's like to see the quilt in the mirror.


D  Auswahl aus 2 schönen Sechecken...
E The choice between 2 nice blocks... 
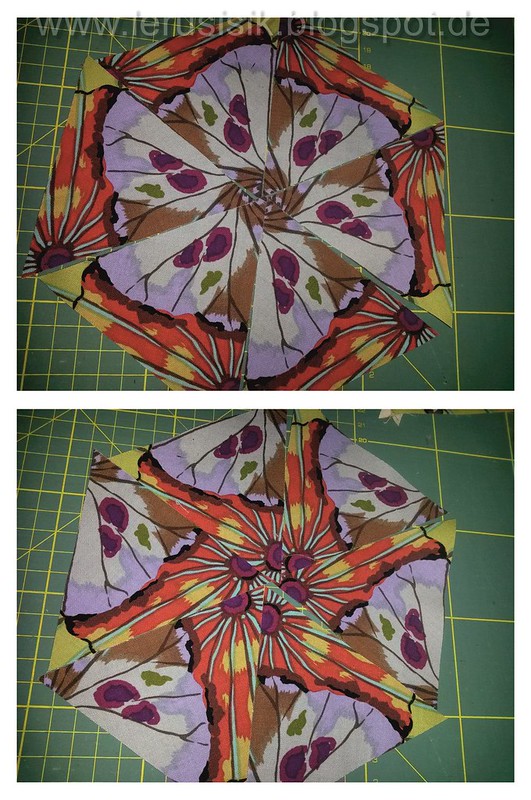

D  ... or 3..
E ... oder aus 3...
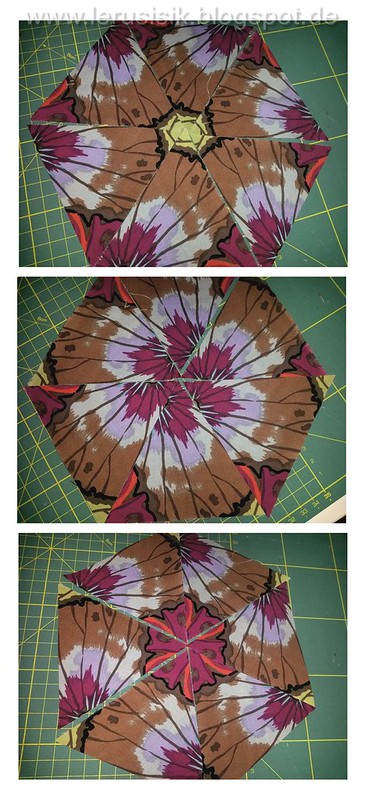
D  ... oder sogar aus 4 Varianten!
E ... or even 4 hexagons:


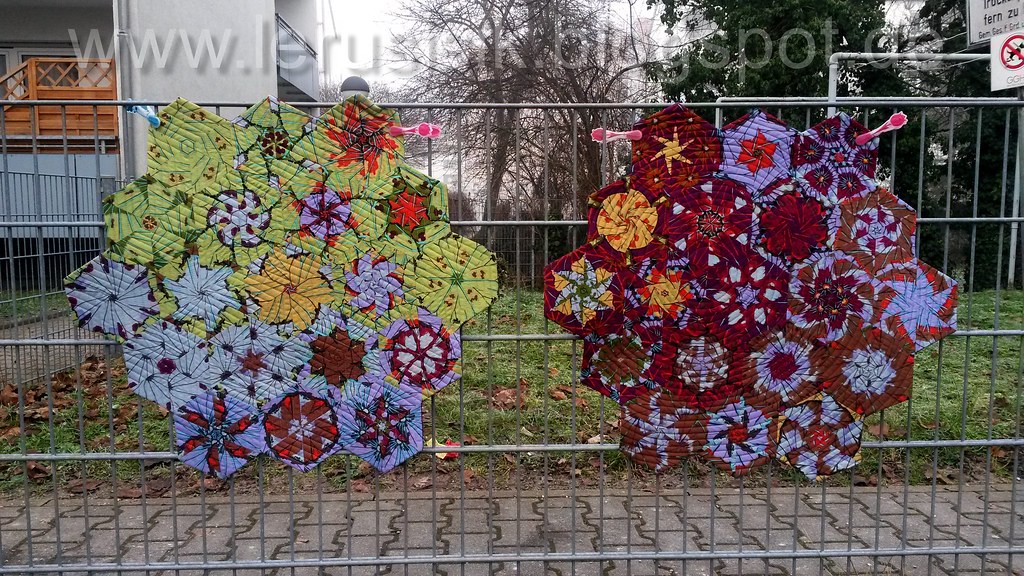
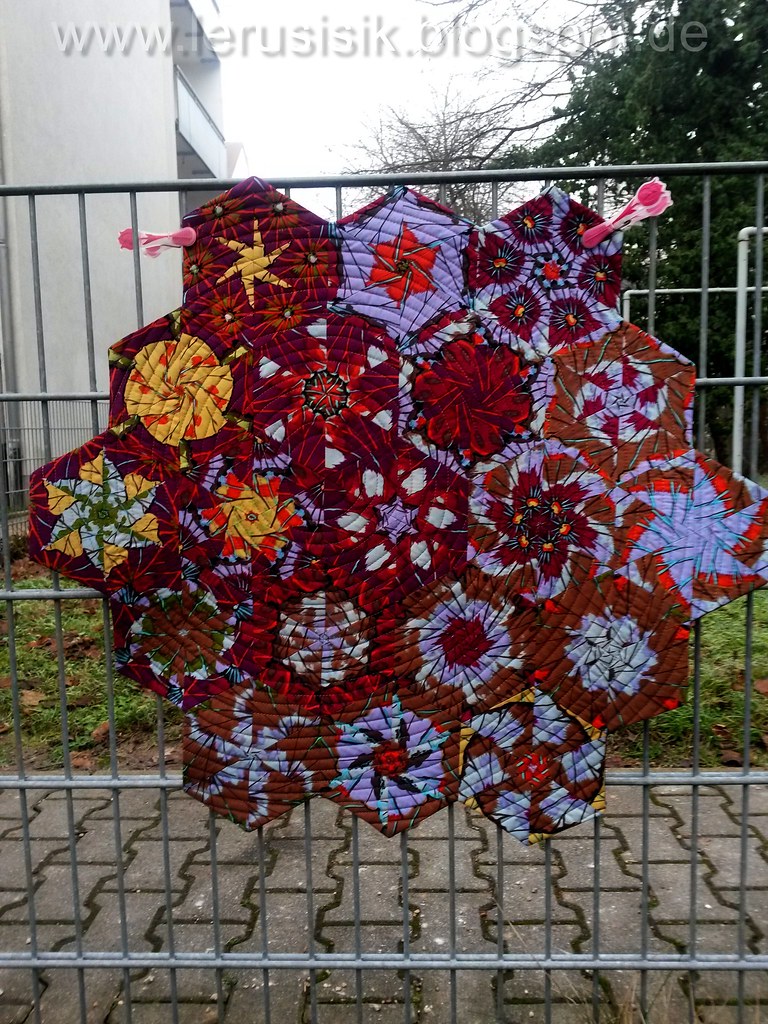
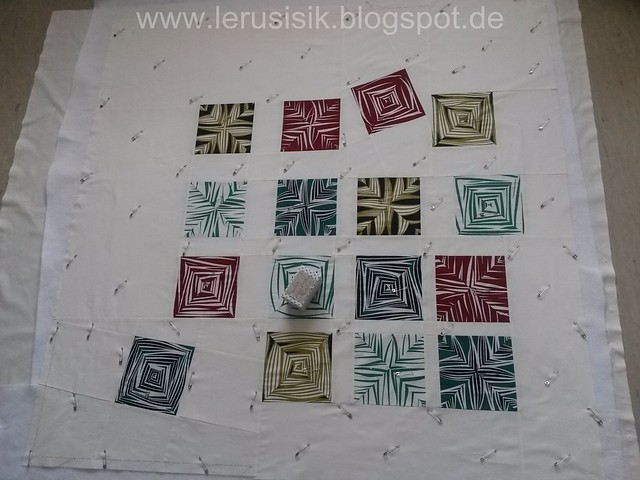
D  Die richtige Gestaltung der Blöcke und die Form des fertigen Quilts brauchten noch viel mehr Mühe, auch wenn es so viel Spass machte. Ich entschied mich für drei kleinere "Schneeflöckchen"-Quilt, für die ich alle 57 Sechecke gebrauchen konnte. Die 3 Quilttops sind auf dem Foto - nur die Tops, weil einer davon schon im Patchworkladen "Design im Stoff" als Beispiel für den Kurs hängt:

E The final layout of the quilt was not easy either. I opted for 3 smaller "snowflakes" - I could use for them all 57 hexagons. You can see the 3 quilt fronts at the photo below - just the fronts, because one of them is already in a quilt shop in Schwetzingen announcing the kaleidoscope workshop:


D  Zwei andere Quilts sind schon fertig genäht und gequiltet:
E Two other quilts are quilted and ready:


D  Ich quiltete beide mit dem Obertransporter: den Roten mit einer exzentrischen Spirale:
E I quilted both with the walking foot: the brown red one with an excentric spiral:


D  ... un den in Lila-Grün - mit Zickzackmister:
E ... and the green violet one with a zigzag pattern:


D  Und am Ende machte ich das, was ich immer vorhatte, aber nie gemacht: aus kleinen rechtwinkligen Dreiecken, die beim Verschnitt  an den Enden der Streifen bleiben, machte ich so etwa wie mugrugs - 2 Miniquilts je 16 x 24 cm.
 E As a final touch I've made something that I always wanted to do and never did: I used small half-triangles that remain at the ends of the stripes and made two mug rugs:


D  Den Hintergrund (ohne Foto) ist auch sehr gepatcht, weil ich dafür  kleine Reste des Hintergrundstoff genommen; das Volumenvlies ist auch gepatcht, das heißt: nach dem Proekt gibt es KEINE RESTE! (Keine Reste von den für die Kaleidoskope gebrauchten Materialien, meine Restekiste ist nach wie vor voll)

E The back sides of the mugrugs are made from the scraps from the backing fabric. The interfacing is just as well from the scraps of batting. So I don't have any leftovers from this  project, great!

October 27, 2014

Nearly

This post was the last one in my blog when I've heard about Blogger Quilt Festival. I never ever took part in it before but now I think it's just the time. So I submit the quilt described below for a category "Modern quilt" and enjoy my participation and all other quilts at the festival! Thank you, Amy, for such a wonderful quilt event! Thank all the visitors for coming!
Valerija Mezhybovska a.k.a lerusisik

AmysCreativeSide.com


D  Es fing im Jahr 2010 an, als das damals neu entstandene IKEA hej community mir vorschlug, einen textilen Workshop zu geben und mir dafür Stoffe schickte. Die Stoffe waren aus Josefin-Serie, typisch IKEA, seltsam, aber interessant.

E It started in 2010 when the IKEA hej community proposed me to give a workshop with their fabrics and sent me fabrics too.  The fabrics were typical IKEA-y, strange but interesting.

D  Dies is einer der Stoffe. Gerade das Richtige fürs Thema Küche - oder? Daraus habe ich einige Kaleidoskop-Blöcke gemacht (Pseudo-Kaleidoskope weil es keine genauen Wiederholungen des Musters gab), die zu einem Quilttop verarbeitet und damit was es: für 4 Meter Stoff und 4 Workshops hatte ich nur eine Woche). Also: das UFO war fertig!

(Den kompletten IKEA-Workshop ist hier zu finden. Fragt mich nicht wie man sich da orientieren kann, aber es gibt meht Fotos in den Kommentaren)

E This is one of those fabrics - IKEA Josefin. Nice for a kitchen-themed workshop, isn't it? I've made some kind of kaleidoscopes out of it, sewed them to a quilt top and stopped there (I had only one week for 4 workshop item). In other words, I've made another UFO.

(If you're interested you can find the workshop in German language here. Don't ask me how to navigate there, but there are more photos in the post and in comments)


D  Das war nur eins von mehreren UFOs aus meiner riesigen UFO-Kiste. Aber gerade dieser Quilttop wollte mich nicht in Ruhe lassen. Also ich gab auf, trennte den Quilt auseinander abgesehen von Quadraten und als fortgeschrittene Designerin kreiierte die völlig neue Version:

E I have the huge UFO box at home, but it was this top that didn't want to leave me in peace. So I gave up: I  took the whole thing apart save the pseudo-kaleidoscopic squares and used my improved design skills to make a new layout:


D  Die aktualisierte Version des Quilttops war im Nu fertig, nun war das Quilting dran. Die freigequiltete Schnörkel kamen überhaupt nicht in Frage, das Quilting sollte minimalistisch sein, so etwa wie gerade Linien vom Rand zum Rand. Am Ende war das Design nicht so minimalistisch: ich quiltete 2 riesige Spiralen und füllte die Lüken doch mit geraden Linien aus.
Die Spirale sind ganz einfach zu quilten mit dem Transporter, man muss nur die erste Runden markieren, weiter geht's immer füßchenbreit. Meine Markierungen habe ich mit einem Aqua-Trickmarker gemacht. Sehr vorsichtig mit einer Pinsel waschte ich die Linien ab und wehe! Die  IKEA-Stoffe färbten ab! Natürlich soll man die Stoffe für die Kaleidoskope nicht vorwaschen und ich waschte sie nicht vor! Und der Quilt ist beinähe fertig! Mit der Enttäuschung kämpfend, mache ich schnellst das Binding, werfe den Quilt in die Waschmaschine mit mehreren Farbfangtücher; wasche ihn, lasse zum Trocknen au dem Bett. Nun ist es mir unklar, ob es die Farbreste oder nur die Nahtzugaben durch den hellen Stoff sichtbar sind.


E The top was ready and waiting to be quilted. The free motion curls and tendrils were out of question, the quilting had to be minimalistic, like straight lines from edge to edge. Still not so minimalistic: I made two huge spirals and filled the rest with straight lines.
The spiral quilting is very simple, there are enough instructions in the internet. I marked only the starting loop of spiral with a water soluble marker. Washing the marking lines away, the IKEA fabric started to bleed! I should have known this, I didn't prewash fabric to get the perfect kaleidescopes.  It was really, really frustrating. I promptly finished the quilt and washed it with a ton of color catching sheets. And still something is visible and I really don't know if it's the traces of color or just the seam allowances.


D  Auch das Photoshooting klärt das nicht ab. Im Gegenteil: jede fast unsichbare Abweichung sieht auf dem Foto  vergrößert und verstärkt aus, jedes Fältchen wie ein Berg.

E The photo shoot  didn't help me to show the quilt: every barely visible bump on the quilt looks like a mountain and every spot of light  as stain.


D  Die Rückseite zeigt das gleiche Effekt: in Wirklichkeit sind die farbigen Quadraten völlig unsichbar von dieser Seite.
E The back side of the quilt proves my words: actually the color squares are not visible from this side.


D  Ich habe vor, den Quilt fürs QuiltCon 2015 einreichen. Da er beinähe weiß ist, die Quadraten beinähe Kaleidoskopen sind und die Quadraten beinöhe im Raster stehen, will ich ihn "Nearly" - "Beinähe" nennen.

E I'm going to submit the quilt to the QuiltCon 2015. The quilt is nearly white, the squares are nearly kaleidoscopes, the layout is nearly grid - so I'll call it "Nearly".

April 3, 2014

IKEA Miracle of Denim II: without IKEA or denim


D Die Tasche  IKEA - Miracle of Denim  ist mir so gut gelungen dass ich eine Einladung bekam, einen Kurs über sie zu machen. Für den Kurs habe ich eine neue Version der Tasche gemacht, Leider habe ich Stoffbedarf  fasch auskalkuliert und enttäuscht entdeckt, dass ich nicht genug Hauptstoff habe. Zum Glück gab es immer noch genug Stoff um einen gepatchten Taschentop zu machen. Was ich auch gemacht habe.

Ich mag schwarz-weiße Stoffe über alles, aber oft brauchen sie meiner Meinung nach einige Farbakzente. Ich habe schmale bunte Streifen auf den Zeitungsstoff aufgebügelt und dann auf der gesamten Oberfläche breite Zigzacklinien als Strahlen gestickt, dabei die Stoffstreifen befestigt und gleichzeitig den Quiltsandwich gequiltet.

Nach der Kampf mit den Reißverschlussen, Schnallen und Riemen (wir sind ständig im Kampfzustand) war die Tasche fertig. So sieht sie aus:

E The bag IKEA - Miracle of Denim had such a great success that I was asked to make a workshop on it. For the workshop I've made another version of the bag out of the fabrics of the shop owner. Unfortunately, I've miscalculated the fabric amount and got not enough of focus fabric (black and white newspaper pattern). But there was still enough fabric to make a pieced bag top. So I've made a kind of irregular sawtooth stripe to join the black and the printed fabric..

I just love black and white fabrics, but as for me they often need a touch of color. I've added some narrow strips of bright batiks: fused them on the newspaper fabric and then secured them and at the same time quilted the surface with wide zigzag lines through all layers of quilt sandwich.

After several minor difficulties with the closure, zippers and handles (I always have difficulties with them) all the parts took their place and now the bag looks like this:


D Als Zierstoff habe ich noch ein Fat Eight von einem schwarzgepunkteten Stoff bekommen, der ist am oberen Rand auf der Innenseite der Tasche zu sehen.
E Forgot to say, I've got a fat eight of black dotted fabric, you can see it inside the bag at the opening.


D Das ist die einzige Aufnahme wo man das Quilting des Taschenboden sehen kann.
E It's the only photo where the quilting of the black part is visible.


D Und auf diesem Foto sieht man fast alle Points der Tasche: spritzerförmige Applikation, ein Reißverschlussfach hinten,Zickzackpatchwork und die Riemen.

Mehr Info zum Taschenkurs in Schwtzinngen finden Sie hier.

E And here you can see almost all features: "splash" appliquee, zippered back pocket, zigzag border, straps.

You can find more  info about the workshop here (German)


February 4, 2014

Origami Squares strike again

D  Endlich ist es soweit: ich gebe einen Patchwork-Kurs! Am 19. Februar in Schwetzingen. Das Thema ist mein Lieblingsblock seit Jahren, und zwar Origami-Quadrat.

Die erste Tasche mit dem Origami-Quadrat habe ich im Jahr 2007 nach einem japanischen Buch gemacht und seitdem mehrere Male nachgemacht. Denn sie war so populär! Die Leute auf den Strassen... ok, nicht direkt auf der Strassen, aber mehrmals auf den Patchwork-Ausstellungen haben mich  in die Ecke getrieben und verlangt, dass ich sofort auf der Stelle erklärte, wie der Block gemacht wurde.

E At last! I'll give a patchwork workshop! At February 19 in Schwetzingen. The theme is the Origami Square, my favorite block for ages. I´ve made my first bag with origami squares in 2007 and made several copies since then, for it was so popular! The people at the streets... ok, not directly at the streets, but the people at quilt excibitions cornered me and demanded an immediate explanation how to fold the block.

"Dark Side of the Origami"- Version
D  Für den Kurs jedoch konnte ich das Model nicht verwenden: 1) es ist nicht mein Entwurf und 2) erwies sich als sehr Zeitaufwendig. Also ich habe eine neue Tasche entworfen Die sollte einfacher und schneller nachzumachen sein

E Still I couldn't use the bag for the workshop: 1) it was not my original model and 2) it was way too complicated. So I've made another one that should be easier to do and to explain.


D  Ich bin besonders stolz auf die Taschengriffe, die habe ich extra für dieses Modell ausgedacht:

E I'm very proud of the handles, I've designed them specially for this bag:


D  So sehen die Origamiquadrate aus. Meine eigene mehrjärige Crashtests zeigen, dass der Block super stabil, machinenwashbar und bügelfrei ist.
E Here is the closeup of the origami squares. My own  longtime crashtests  show that the block is very sturdy, can be washed in the washing mashine and do not need ironing.


D  Direkt für den Kurs habe ich eine andere Variante der Tasche gemacht:
E This version was made directly for the workshop: